 Vidova
Arrange clips and layers
Each clip occupies a stretch of time on a layer. Drag it left or right to change when it plays, or trim an edge to shorten the visible section. Put footage, titles, and audio on separate layers when they need to play together.
Select a clip to see its controls in the Inspector. The available controls depend on the clip: text has typography settings, audio has sound settings, and video and images have framing controls.
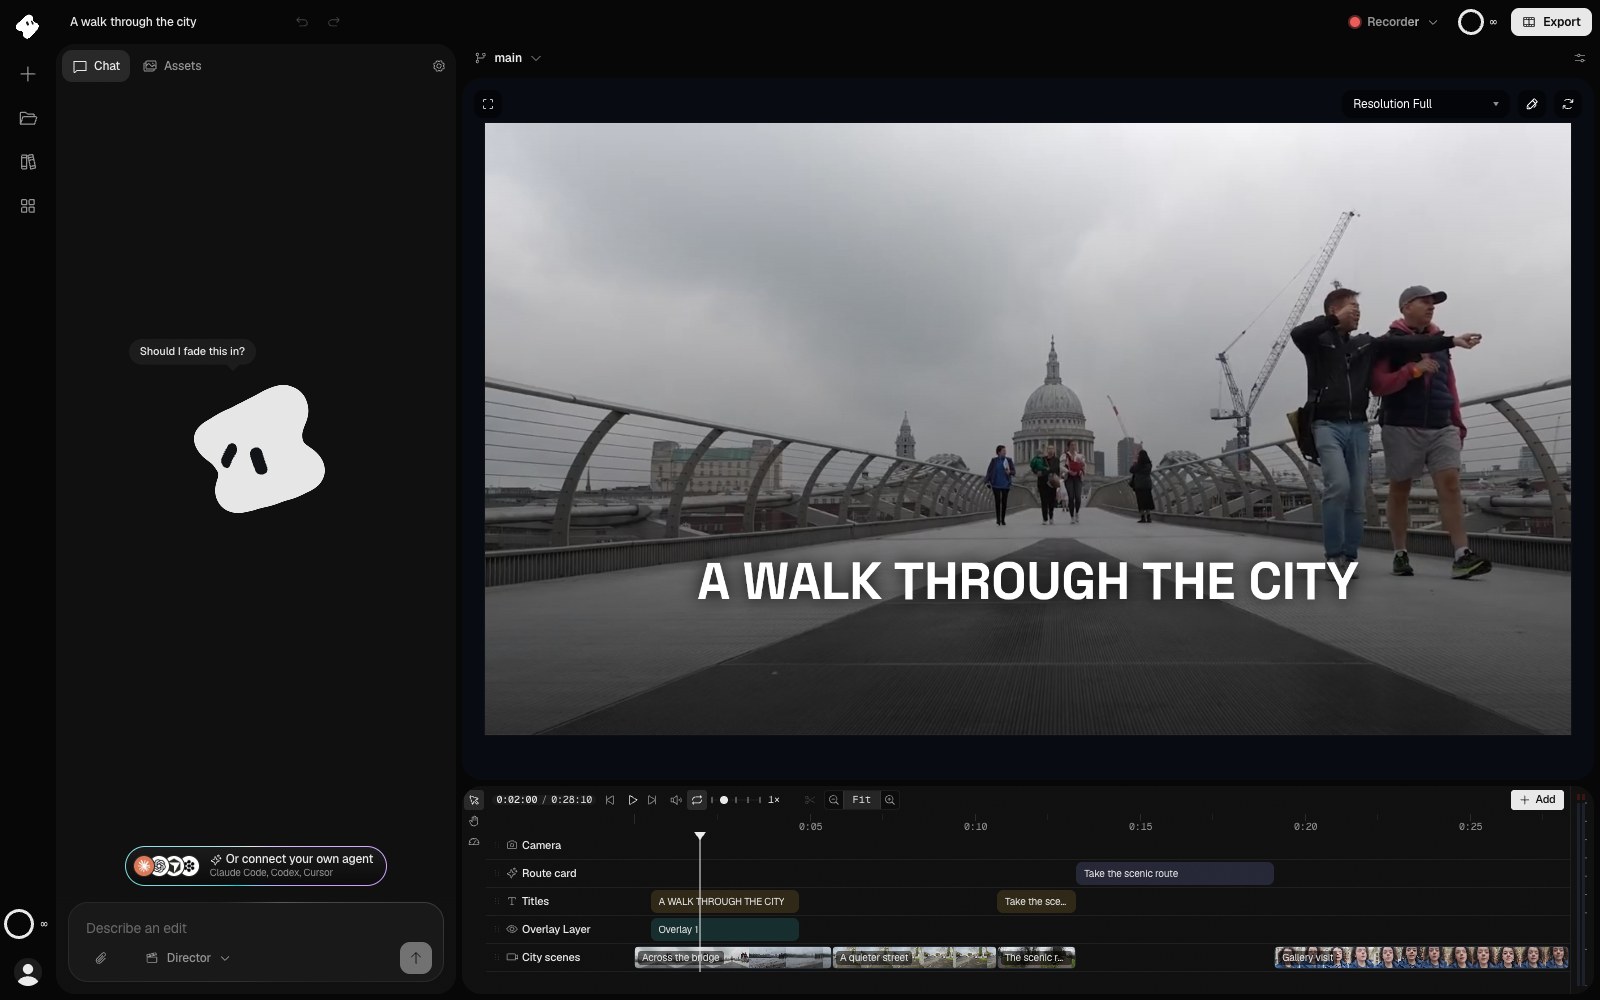
Chat is on the left; the preview and the timeline are on the right. The playhead shows the opening title over the bridge shot.
- Preview: the film at the playhead.
- Timeline: clips on layers. The top row is in front.
- Add puts a new clip at the playhead.
Select the image to open the original full view.
Add clips yourself
Choose Add at the right end of the timeline toolbar to put a new clip at the playhead. To add at another time, right-click an empty part of the timeline and choose from the same menu. The new clip is selected, so the Inspector opens on it.
| Choice | What it adds |
|---|---|
| Text | A text clip to type over and style in the Inspector. Press T to add one at the playhead. |
| Media from this project | A clip of a video, image, sound, or element the project already has. |
| Upload from computer | Uploads the files you choose and puts each one on the timeline as soon as it can play, one after another. |
| Element | An animated graphic from the published catalog, such as a title, a counter, or a list. See Elements and components. |
| Overlay | A region above the footage. Change its style to a blur, a color, a scrim, or a highlight. See Overlays and highlights. |
| Camera move | A pan, zoom, or turn of the whole picture on the Camera layer. |
| Zoom | A zoom on the screen recording under the playhead. It shows when the project has a screen recording. |
| Effect | An effect from the effects library, such as a hit or a glow on a person. |
A new clip goes on the first layer of its kind that is free at that time. When no layer has room, Vidova adds a layer above it. In Assets, the + on a card does the same for that asset.
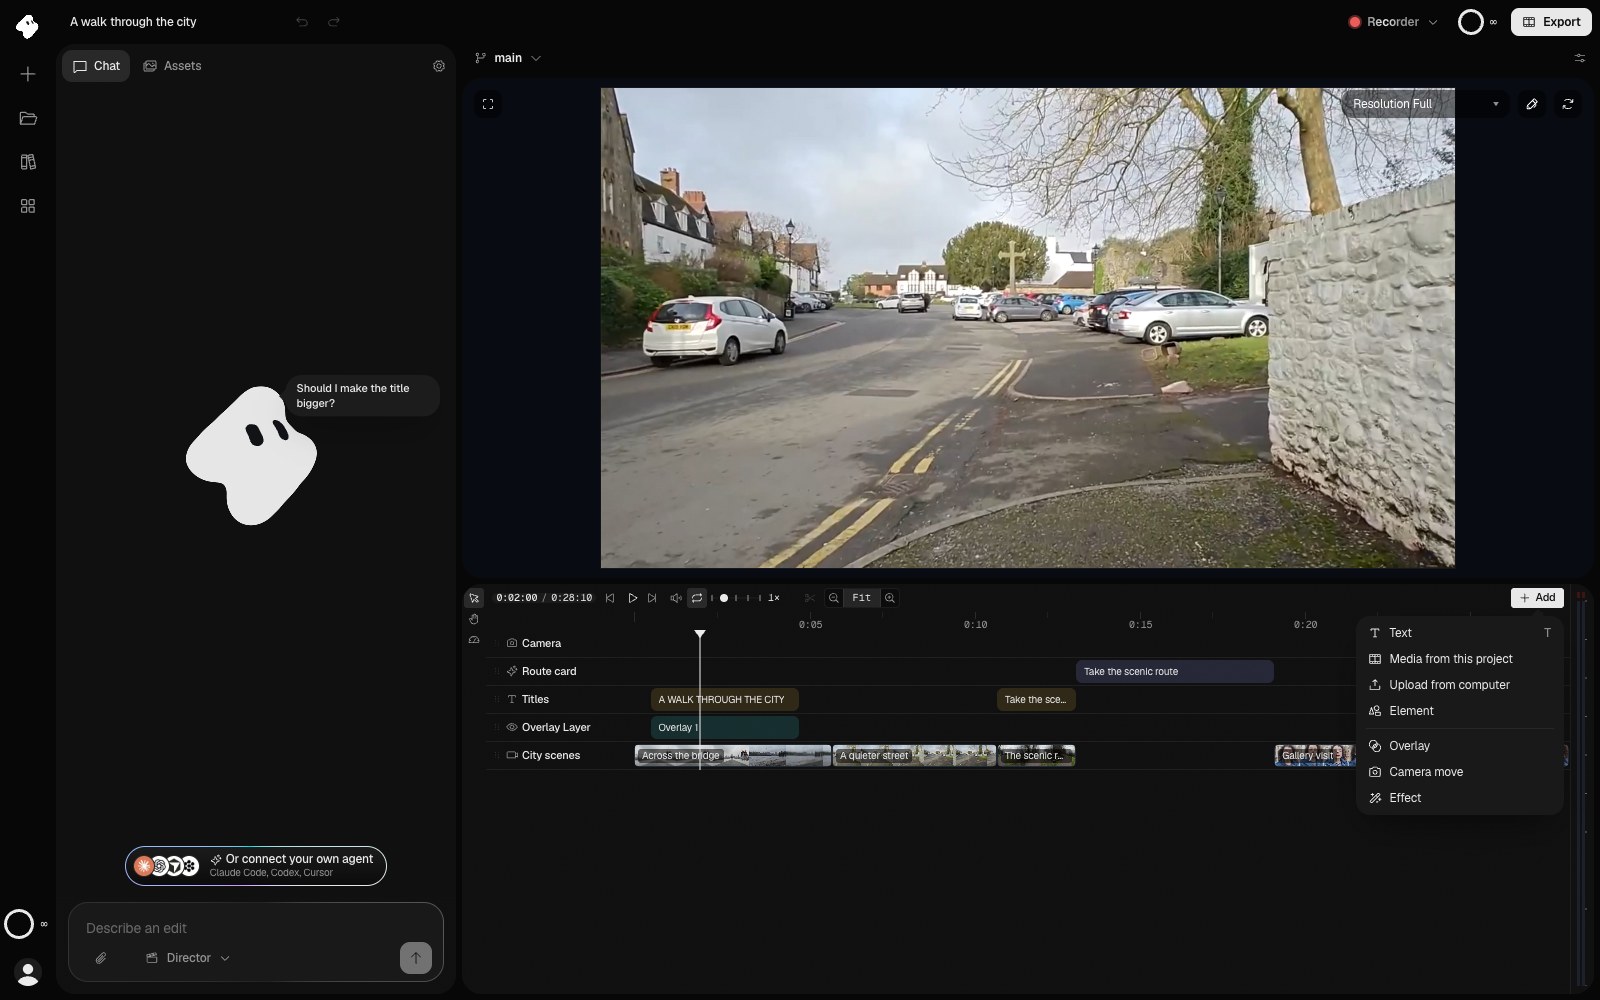
Add puts a new clip at the playhead. Text, overlays, and camera moves go in at once; media and elements open a picker.
Select the image to open the original full view.
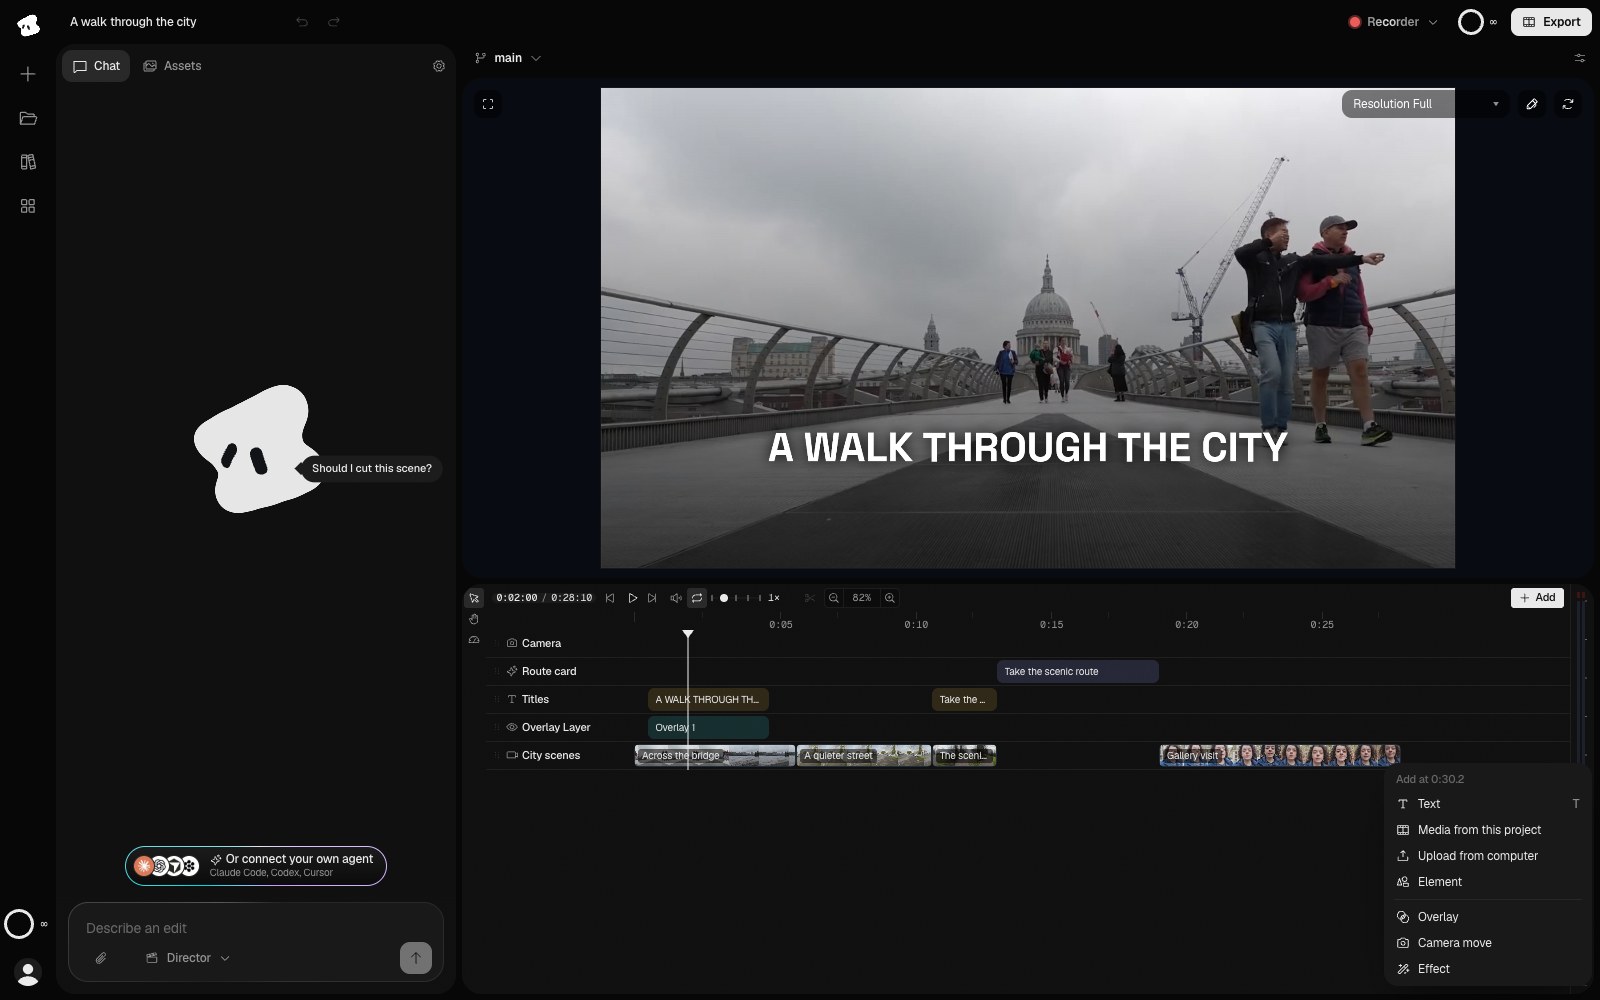
Right-click an empty part of the timeline to add a clip at that time instead of at the playhead.
Select the image to open the original full view.
Duplicate, copy, and paste clips
Select one or more clips and press Cmd/Ctrl + D to duplicate them. The copies go right after the last selected clip, on the same layers when there is room.
Cmd/Ctrl + C copies the selection and Cmd/Ctrl + X cuts it. Cmd/Ctrl + V pastes at the playhead, and the copies keep their spacing. Right-click a clip for the same actions, or right-click an empty part of the timeline and choose Paste to paste at that time.
A copy keeps everything the clip has: its text and style, color, effects, keyframes, and transitions. Copied clips paste into the same project. Text you select on the page still copies as text, and a file you copy from your computer still imports as media.
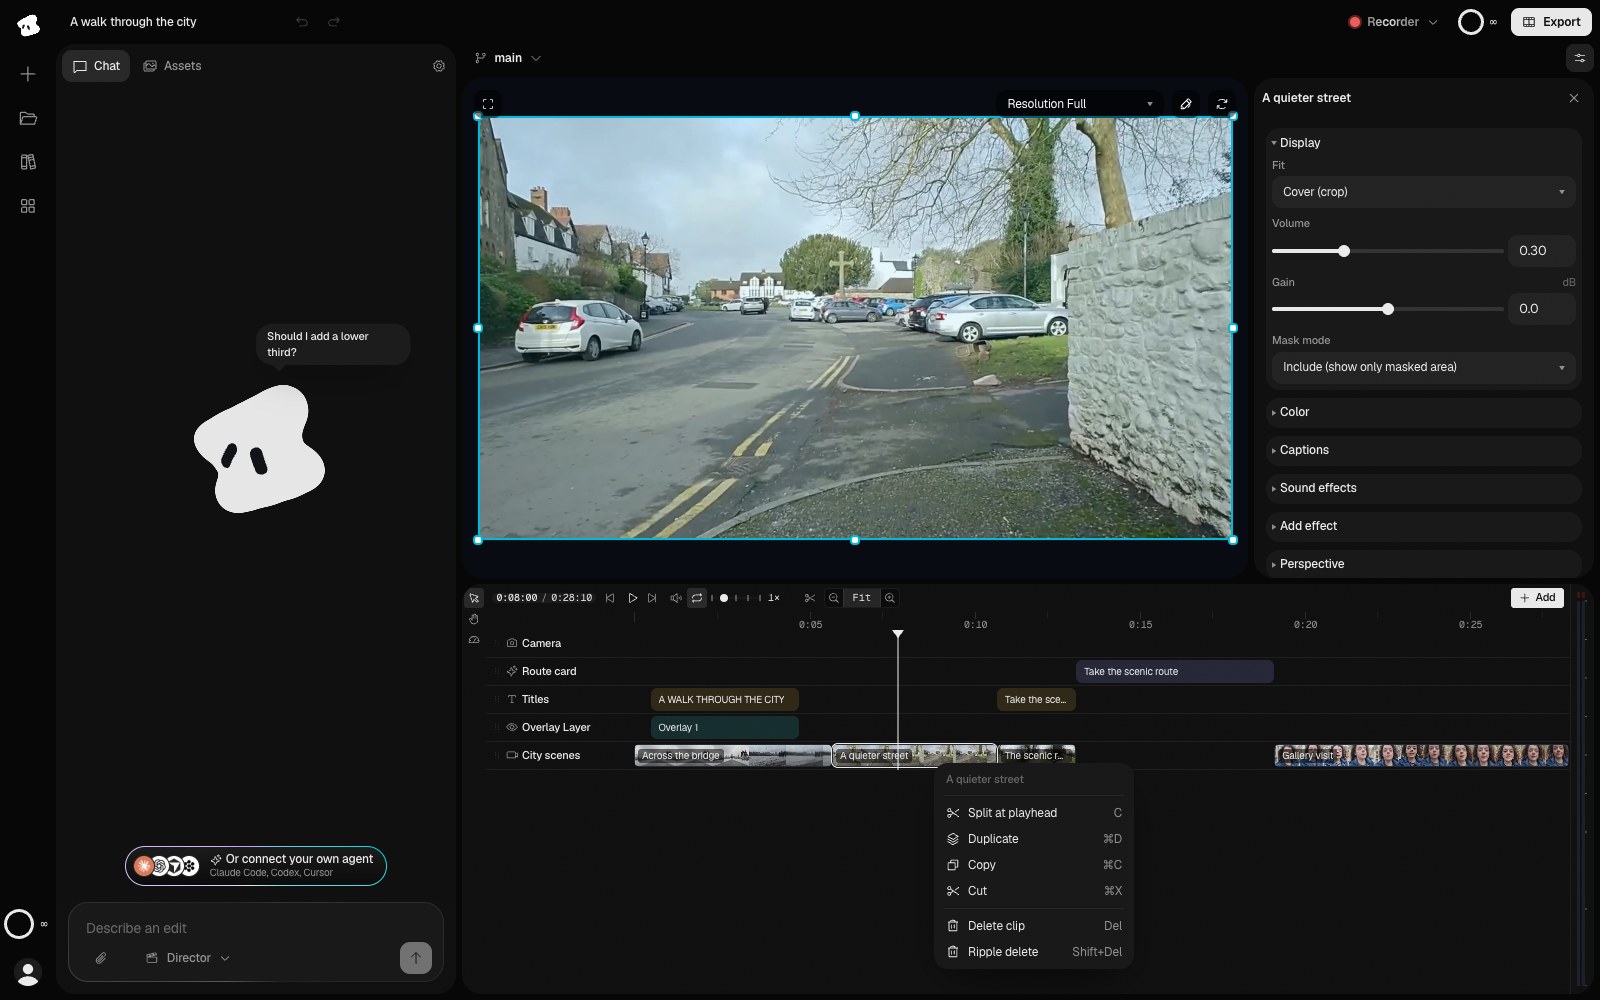
Right-click a clip to split, duplicate, copy, cut, or delete it. The playhead is inside this shot, so Split at playhead is available.
- Duplicate, copy, or cut the clip. Paste puts a copy at the playhead.
Select the image to open the original full view.
Watch the audio levels
The meter at the right edge of the timeline shows the film’s left and right levels while it plays. Green is a normal level, yellow is loud, and red is close to full scale. The white mark holds the latest peak for a moment.
A red light at the top of a bar means the mix went over full scale. Vidova rounds off those peaks so they do not crackle, but turn down the loudest clip if the light keeps coming on. Click the meter to clear the lights. See Audio and music for volume and gain.
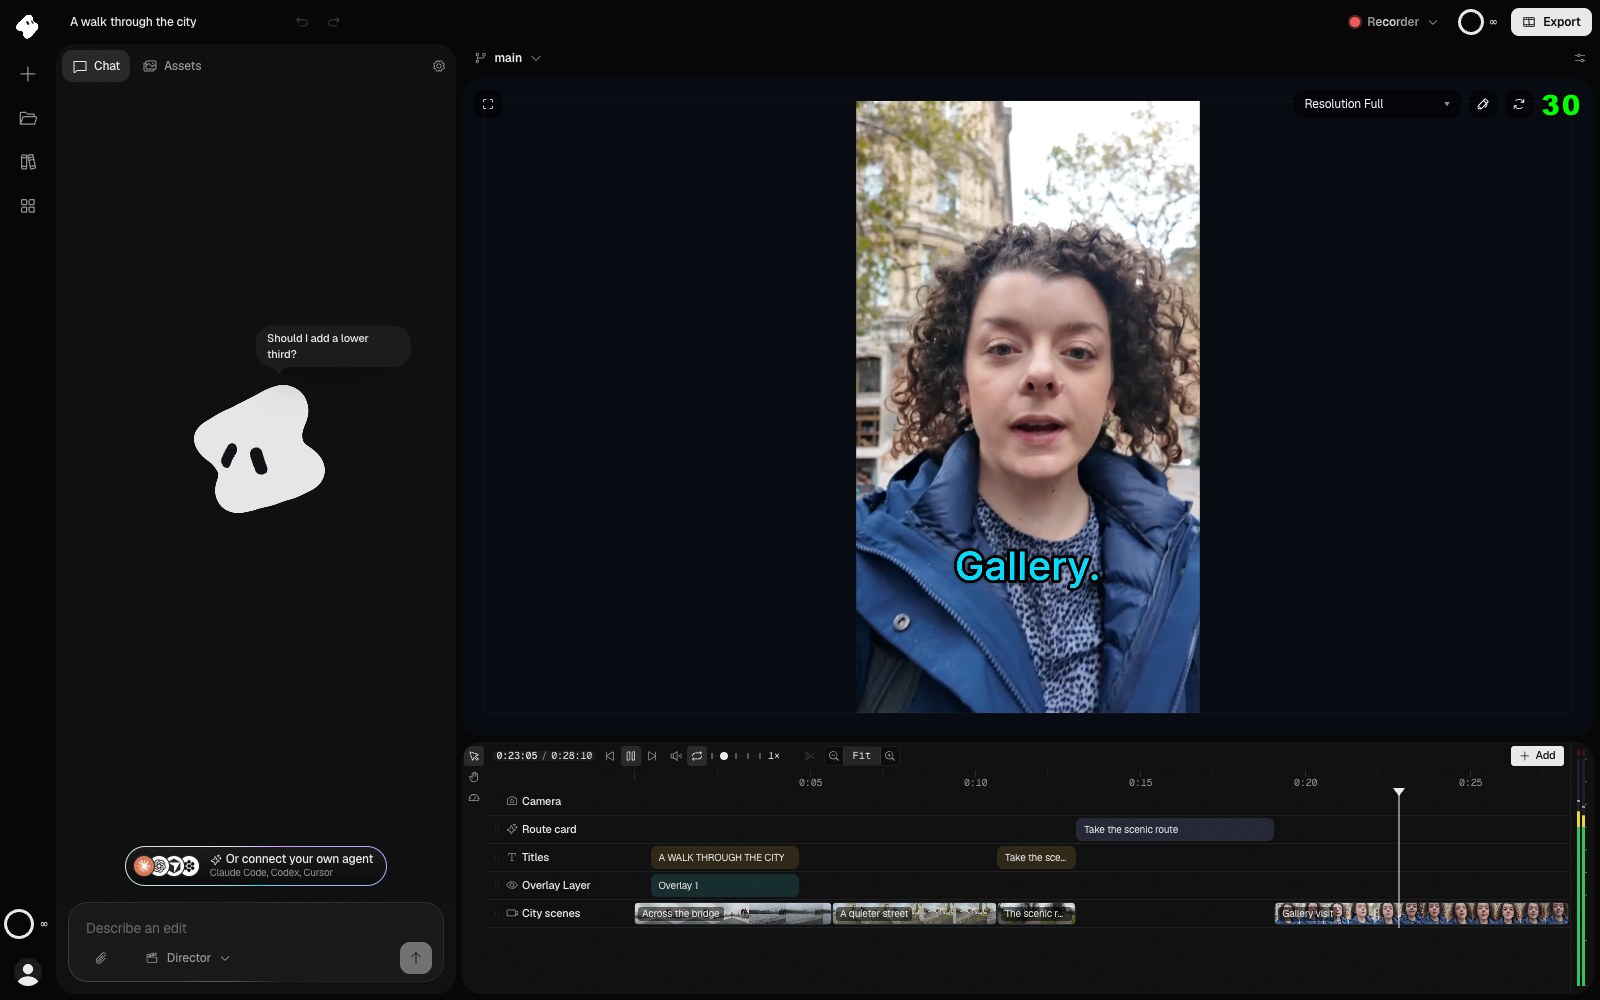
The meter shows the left and right levels of the film while it plays. The white marks hold the latest peaks.
- Left and right levels. Red at the top means the mix is too loud.
Select the image to open the original full view.
Set precise timing
Open Timing in the Inspector when dragging is not precise enough.
- Start places the clip in the edited film, in seconds.
- Offset chooses the starting point within a source video or audio file.
- Duration sets the clip’s duration before its speed is applied.
- Speed changes how quickly it plays. At 2× speed, a ten-second section takes five seconds on the timeline.
At normal speed, Start 3, Offset 10, and Duration 5 places seconds 10–15 of the source at seconds 3–8 of your film. The playback speed control beside the preview transport changes how you review the edit; the clip’s Speed setting changes the edit itself.
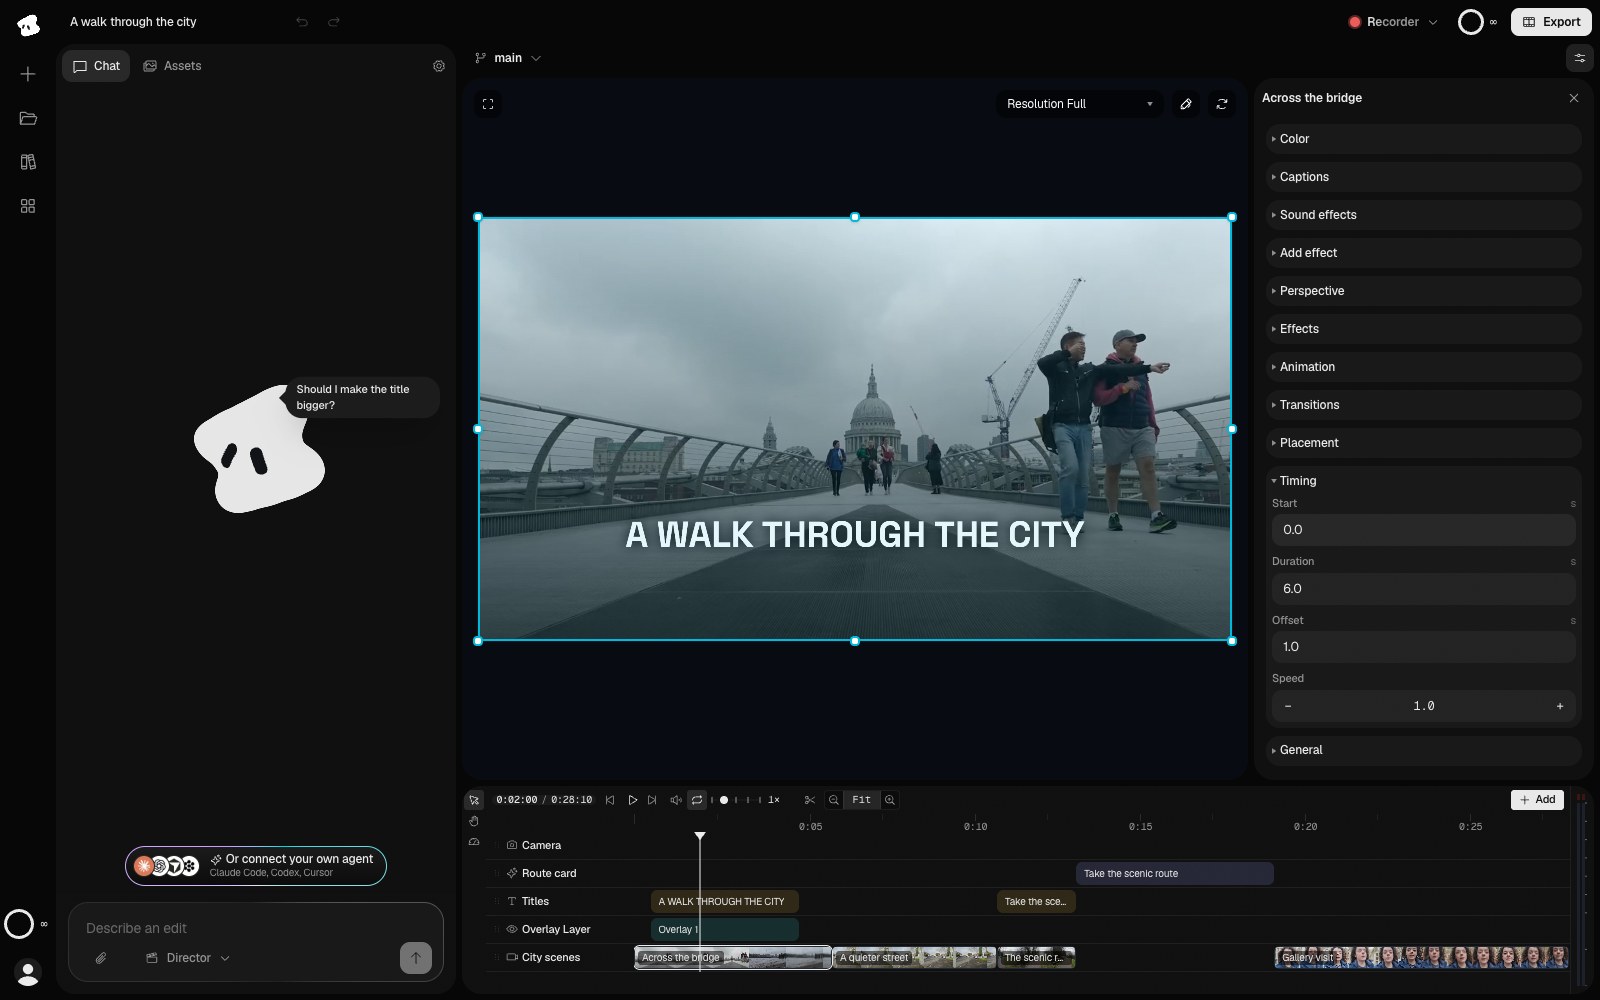
Start places the shot in the film; Offset chooses where to begin in the source. This shot uses a one-second source offset at normal speed.
Select the image to open the original full view.
Fit a shot to the frame
Select a video clip and open Display → Fit. Fit (letterbox) keeps the whole image visible, Cover (crop) fills the area by cropping, and Stretch to fill changes the image’s proportions.
Use Placement to adjust position and scale. When adapting landscape footage to a vertical canvas, preview the whole shot so a moving subject stays in frame.
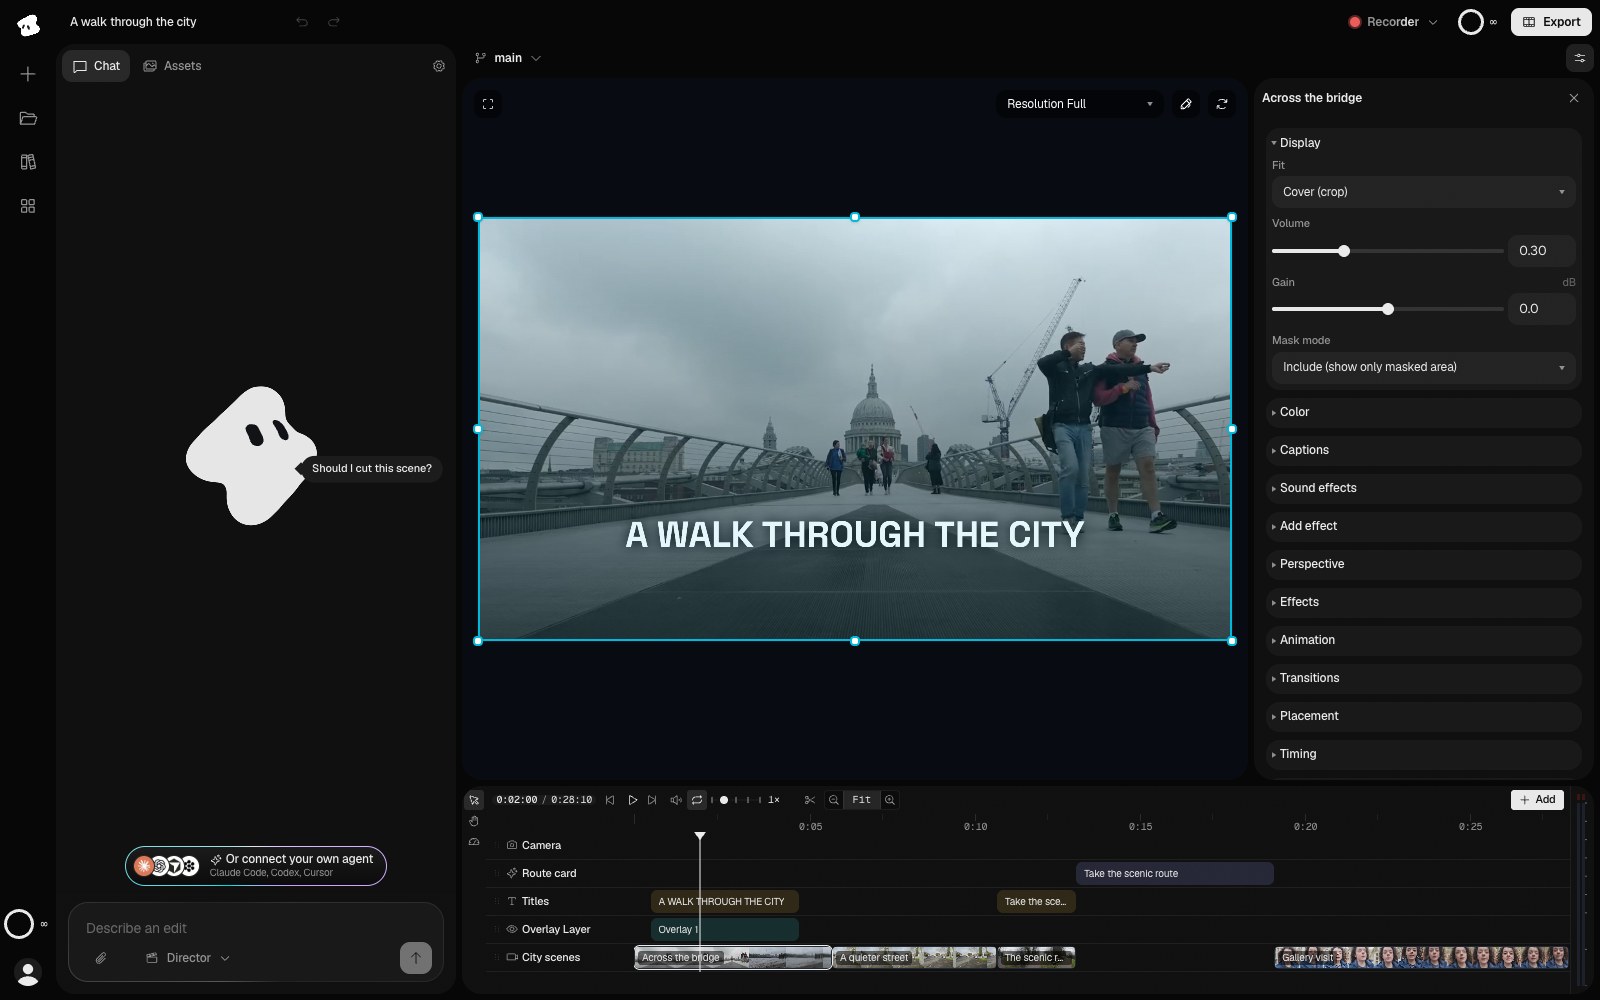
Display controls how the source fits its frame and how loudly its audio plays. An applied mask has its own Include or Exclude mode.
- Volume changes the source audio on this clip.
Select the image to open the original full view.
Split, delete, and close gaps
Move the playhead to the cut and press C to split selected clips at that time. With no clips selected, C splits video, image, and screen-recording clips under the playhead.
Delete or Backspace removes the selection. Use Shift + Delete or Shift + Backspace for a ripple delete that closes the space. Selecting a gap and deleting it closes that gap.
Undo and Redo are available in the workspace header. Check the preview after timing changes, especially when speech, music, and captions must stay aligned.
Timeline shortcuts
Use these while editing, outside a text field or dialog.
| Key | Action |
|---|---|
| Space | Play or pause |
| ← / → | Step backward or forward one frame |
| C | Split at the playhead |
| T | Add a text clip at the playhead |
| Cmd/Ctrl + D | Duplicate the selected clips |
| Cmd/Ctrl + C / X | Copy or cut the selected clips |
| Cmd/Ctrl + V | Paste copied clips at the playhead |
| V | Selection tool |
| H | Hand tool |
| R | Speed tool |
| Delete / Backspace | Delete the selected clip, keyframe, or gap |
| Shift + Delete / Backspace | Ripple delete clips |
| Escape | Clear the clip selection |
Describe timing in chat
Give the agent a target clip and a precise change: “Trim the first shot to three seconds” or “Move the title to start at 00:05 and keep it on screen for two seconds.” Say whether a timestamp refers to the source video or the finished film.
For the next step, see Captions and transcripts, Audio and music, or Animation and transitions.